Mostrando postagens com marcador encadernação. Mostrar todas as postagens

domingo, 12 de julho de 2015

Emendas, sempre uma questão!...

Muitos têm dificuldades em emendar linha e daí preferem usar uma linha imeeeeensa, sem prestar atenção a que isso irá causar problemas mais à frente: a linha embola, dá nós, o trabalho fica mais demorado. Eu, nos meus trabalhos, uso no máximo o comprimento de 5 cadernos e vou emendando à medida que é preciso.
Disponibilizaram este tutorial PAP para emendas e achei muito útil NO final dele, para quem não quer usar as fotos, há um vídeo com o mesmo nó.
Aproveitem!

Deixo o texto no original, para ficar bastante claro que o texto não é meu, mas as fotos são mais do que suficientes para o trabalho!
 (Fonte: http://my-bookbinding.blogspot.com.br/2015/07/attaching-new-thread-to-short-one.html)

Attaching a new thread to a short one during book quires sewing (weaver's knot)

   I understand that this topic maybe not a knowledge target for binders and conservators professionals who normally knows by heart how to do attaching a new thread to the short one during sewing process and we do it thousands of times on our daily binding and sewing work.
So! what features this knot do you thing it should carry ?
Features!! what a strange word for such a very basic and regular process for book binder and book conservators as well, but think carefully now!
mmmm yes! it should be:
  • Strong, which means that when we continue sewing and pull the new threat it should be strongly attached and knot to the small (old) one.
  • Even if you will attach the new thread from inside the quires or outside it (from the spine depend on your technique) you still DO NOT want to have a large solid knotwhich will cause a large hole when you trying to take it throw to the inside of the sections (in case of you prefer this technique). and also if it is large knot it will make bad appearance to your final sewing quality and maybe the quires themselves.
  • What if you have only a very short end thread? in case of accidentally cut of the threads as example, and you are not then happy to reverse the sewing for the last quire to get a longer thread end to make you easily able to knot it with the new one.
Book Sewing
So now you understand that your new thread should be attached to the short one with 3 basic features
  1. strong knot.
  2. small knot.
  3. easily attached to a short end.
performing a weaver's knot will give you all those features and here is step by step picture tutorial teaching you how to do this knot.

note: I am using here 2 thread colors to make it easy for this tutorial to distinguishes the process
Short thread (A) White & new thread (B) blue
I will point to the short thread (the thread that is in your quire) with the White(A) thread and the new one (which you wont to knot with the short one) with the Blue(B) thread in the tutorial pictures.

step 1:
Loop the new thread (B)


The longer end of the thread (B) is brought up throw the loop


Pull up the long end from the middle of the loop then bull together the longer and the shorter ends of thread (B) until it make a sort of hanging knot.

Step 2:
Place over the short end (A) of the old thread inside the loop, the encircling loop must not be tightened.


Pull both longer and shorter ends together for the new 
thread (B) in a opposite direction.


Step 3:

Now the tricky part and you should be sure that you did it as I explain or as the photo shown below, otherwise your knot will fail to be strongly attached to the old one. >>>
The new thread (B) is tightened the short end (A) throw the encircling loop which tightensbehind it as shown in pic(8)

pic(8)

Note: In all previous steps, only the new thread (B) ends (the shorter one and the longer) pulled.

NOW you tight the knot pulling both threads the short one (A) and the new one (B) from both longer sides to completely knot them, 


Both short ends (A) & (B) are cut quite close to the knot, if you do this knot outside the quires (from the spin direction) carefully take this knot through the inside of the section as sewing is continued.


This tutorial blog is for those who like to print and keep a copy in their reference library, but for thous who prefer to watch a tutorial video, here is one that i have made for you.

terça-feira, 21 de abril de 2015

Otabind

Desconhecia totalmente.De repente, várias referências a ela. Alguns sítios são muito esclarecedores, parece que há uma corrente que é contra a cola quente usada nas encadernações comerciais e
 e prefere este esquema. Voltarei ao assunto, aqui é apenas uma introdução.

A fonte:https://makeyourbookreal.wordpress.com/2012/07/02/bookbinding-otabind/

Bookbinding: Otabind

Traditional methods of bookbinding, such as oversewing (where pages fall out) or double-fan adhesive binding (where margins are lost), will soon have to make way for Otabind.
An article I read over at hyphenpress.co.uk explains the Otabind method in perfect layman’s terms. Hardback (or ‘perfect binding’) books already separate the textblock from the book cover, to allow for pages to lie flat and still remain intact. For paperback (or ‘softbound’) books, however, there has been little improvement in terms of the technical. Creased and broken spines, loose pages, or pages that simply won’t open flat, have become the norm for readers of paperbacks. But now there is a new method of binding that will allow you to read your book open in your lap as you drink a cup of tea.
How does this work? It comes down to the glue.
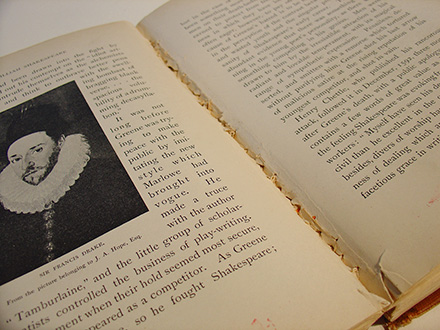
Hot glue, also known as EVA or PUR glue, is heated and applied to the spine of the textblock. It dries quickly and is, as a result, useful for commercial quantities of books, as it can bind large quantities of books and be shipped on the same day. But the disadvantage of hot glue in paperbacks is that it is difficult, nigh impossible, to open the book flat. Below are wonderfully clear examples of hot glue binding from hyphenpress.co.uk:
Cold glue, on the other hand, needs 24 hours to dry, and as such many printers do not want to invest in it, as they can make more profit with hot glue.
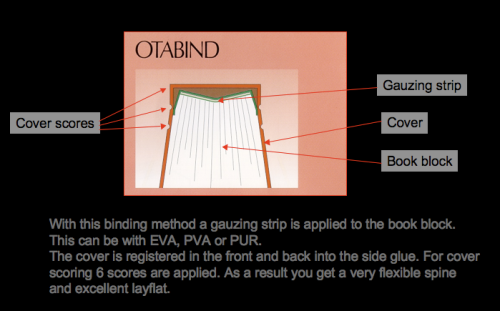
Where does Otabind fit into this? Otabind’s original patent is from 1981, when it was invented by a Finn, Mr Ota. The principle behind it is that the textblock is not glued directly onto the cover, as it is in the examples above. There is a very small amount of cold glue applied to the textblock and left overnight to dry. The paperback cover is then attached to the endpages, and the scores allow the textblock to be separate from the cover. Here’s an example:
The cold glue also ensured that the pages are very difficult to pull loose. Any of the pull tests that I’ve done down in selfpublishbooks.ie have resulted in elbow bruises from hitting it off the desk. The spine, because it’s not attached to the textblock, is never creased or broken. The pages always lie flat; there is never any margin loss.
Why don’t more printers use this? Simply because it is not as quick as hot glue binding, and profits are lost when fewer books are bound.
Selfpublishbooks.ie is one of the few printers in Europe who have the facilities and technology to use the Otabind system, and the satisfaction for readers and writers from this commitment can be found here on their website.
Want some more visuals on Otabind? Have a look at an Otabind machine at work here.
*Latest news*:
We here at Selfpublishbooks.ie just got a lovely book report back from the Henkel Lab Graphic Arts service. They tested one of our Otabind books for bind quality, and this – in a nutshell – is what they found:
The strength of the bind of the pages is almost three times the UK minimum standard.  Furthermore, this outstanding result is achieved using only .2 mm (point 2 of a millimetre) of PVA on the page edge.  This minimum amount of glue, combined with the unique Otabind feature (the gauze on the book block), and deep notching,   gives us not only this superior strength, but also the “lie flat” finish to the book  which is so attractive.
We like the little things.
You can view the full book report here.

domingo, 12 de outubro de 2014

Viagem de 2014

Fui a Boston e Nova Iorque. Como todos sabem, ou deveriam, em Nova Iorque encontra-se qualquer coisa que se precise, apenas é necessário ter o endereço!

Para material de encadernação e conservação e restauro, a Talas continua imbatível. A mudança para o Brooklyn atrapalhou um pouco, mas nada que impeça uma visita. Não se esqueça: apesar de haver uma estação de metrô com o nome da rua, a estação para se descer é a Graham e caminha-se por apenas dois quarteirões, por rua lindas. Comprei algumas coisitas, mas bom mesmo é a régua com as marcações em centímetros e não polegadas, toda furadinha.... alguém aí vai ficar muito feliz, né Mônica?

A Kate Paperie mudou-se novamente. Estou quase desistindo dela, cada vez ela está em algum lugar e anda meio cara.Nenhuma novidade aqui, vá se quiser ver uma loja bonita.

A Dick Blick, apesar do nome ( ou por isso mesmo), está crescendo. Antes, havia apenas duas ou três lojas, e agora está em toda a parte. Mas é uma loja ótima, não compre nada sem antes dar uma passadinha por ela e comparar os preços. Pode ter uma ótima surpresa. Depois de anos, encontrei um macete à venda!!

A novidade foi a Envelopper Ink, uma loja imensa, com muuuita coisa em papel e alguma coisa para encadernação. Vale a visita.
A Envelopper Ink, uma loja muito bonita.
Há outras lojas, outros lugares, não pretendo esgotar o assunto. Mas lembro: se você está procurando por papel e material para trabalhar com papel, não pode deixar de ir  ao New Yor Central Art Supply. Apenas o catálogo de papéis tem mais de 300 páginas. Prepare suas verdinhas, não dá para sair de lá de mãos vazias.

Testem os links acima, se algum der trabalho, mande mensagem para mim que eu conserto. Endereços, catálogos, etc, entrem no site que as informações estão todas lá.

Mas a cereja do bolo da viagem foi a ida a Boston e o encontro com  Jeff Altepeter, o head of bookbinding  da North Benett St. School, onde há cursos de encadernação e joalheria. Mas isto fica para um novo post, de amanhã ou depois.

sábado, 13 de outubro de 2012

Endereço útil


A Universidade de Lausanne disponiibiliza centenas de arquivos sobre encadernação e restauração. Pode ser muito útil, e, o que é melhor, é totalmente desbloqueado para cópia e utilização. Só pedem que, caso usem, citem a fonte. Não é bom??Caso vc se interesse, o endereço

http://www.unil.ch/bcu/page34320.html

Bom proveito!!

segunda-feira, 9 de julho de 2012

Talas

A mudança para o Brooklyn, em 2009, prejudicou um pouco, principalmente para quem é de fora. Mas a Talas tem tudo, ou quase, para quem faz encadernação e restauro. Uma boa reportagem no NYT.

http://www.nytimes.com/2012/07/08/nyregion/talas-the-bookmakers-source-for-parchment-and-hides.html?_r=1

sexta-feira, 25 de maio de 2012

Encadernação

Um vídeo sobre encadernação.

<iframe width="420" height="315" src="http://www.youtube.com/embed/0MmqFLmurpQ" frameborder="0" allowfullscreen></iframe>